A Simple bash script to modify macOS DNS by detecting SSID
- Hank
- 16 Jul, 2024
I believe most of us have different DNS settings for different networks. For example, in my case, I use Google's public DNS `8.8.8.8` and Cloudflare's `1.1.1.1` at home, but at work, I have to clearthe DNS reacord and let my Mac use the default DNS provided by the company.It's a bit annoying to change the DNS settings manually every time I switch networks. So I wrote a simple bash script to automatically change the DNS settings based on the SSID of the network I'm connected to.Here is the script:```bash #!/bin/bash # clear or set dns function set_or_clear_dns() { local current_ssid=$(networksetup -getairportnetwork en0 | cut -d ':' -f 2 | xargs) if [[ "$current_ssid" == "YOUR_COMPANY_WIFI_SSID" ]]; then # Clear DNS to Automatic (Empty) sudo networksetup -setdnsservers Wi-Fi empty else # Set DNS to 1.1.1.1 and 8.8.8.8 sudo networksetup -setdnsservers Wi-Fi 1.1.1.1 8.8.8.8 fi } set_or_clear_dns ```You can replace `YOUR_COMPANY_WIFI_SSID` with your company's Wi-Fi SSID. Ofcause, you can add more SSID conditions and DNS settings as needed. And in the code I just simply clear the DNS settings to automatic when connected to the company's Wi-Fi, you can also set it to other DNS servers, by replacing `empty` with the DNS servers you want to use.
Read MoreMendix: How to debug javaaction with IntelliJ and VS Code
- Hank
- 14 Jul, 2024
Sometimes, you may want to debug the Java actions in Mendix project. In the Mendix Documentation, it only shows how to debug Java actions with Eclipse. But for those who are using IntelliJ or VS Code, how to do that?In this post, I will show you how to debug Java actions in Mendix project with IntelliJ and VS Code.## Debug Java action with IntelliJ1. Open the Mendix project in Mendix Studio Pro 2. Goto you App settings, double click your app configuration. 3. In the `Server` tab, input `-agentlib:jdwp=transport=dt_socket,server=y,suspend=n,address=*:5005` in the `Extra JVM parameters` field. This will enable the remote debug mode for the Mendix project. 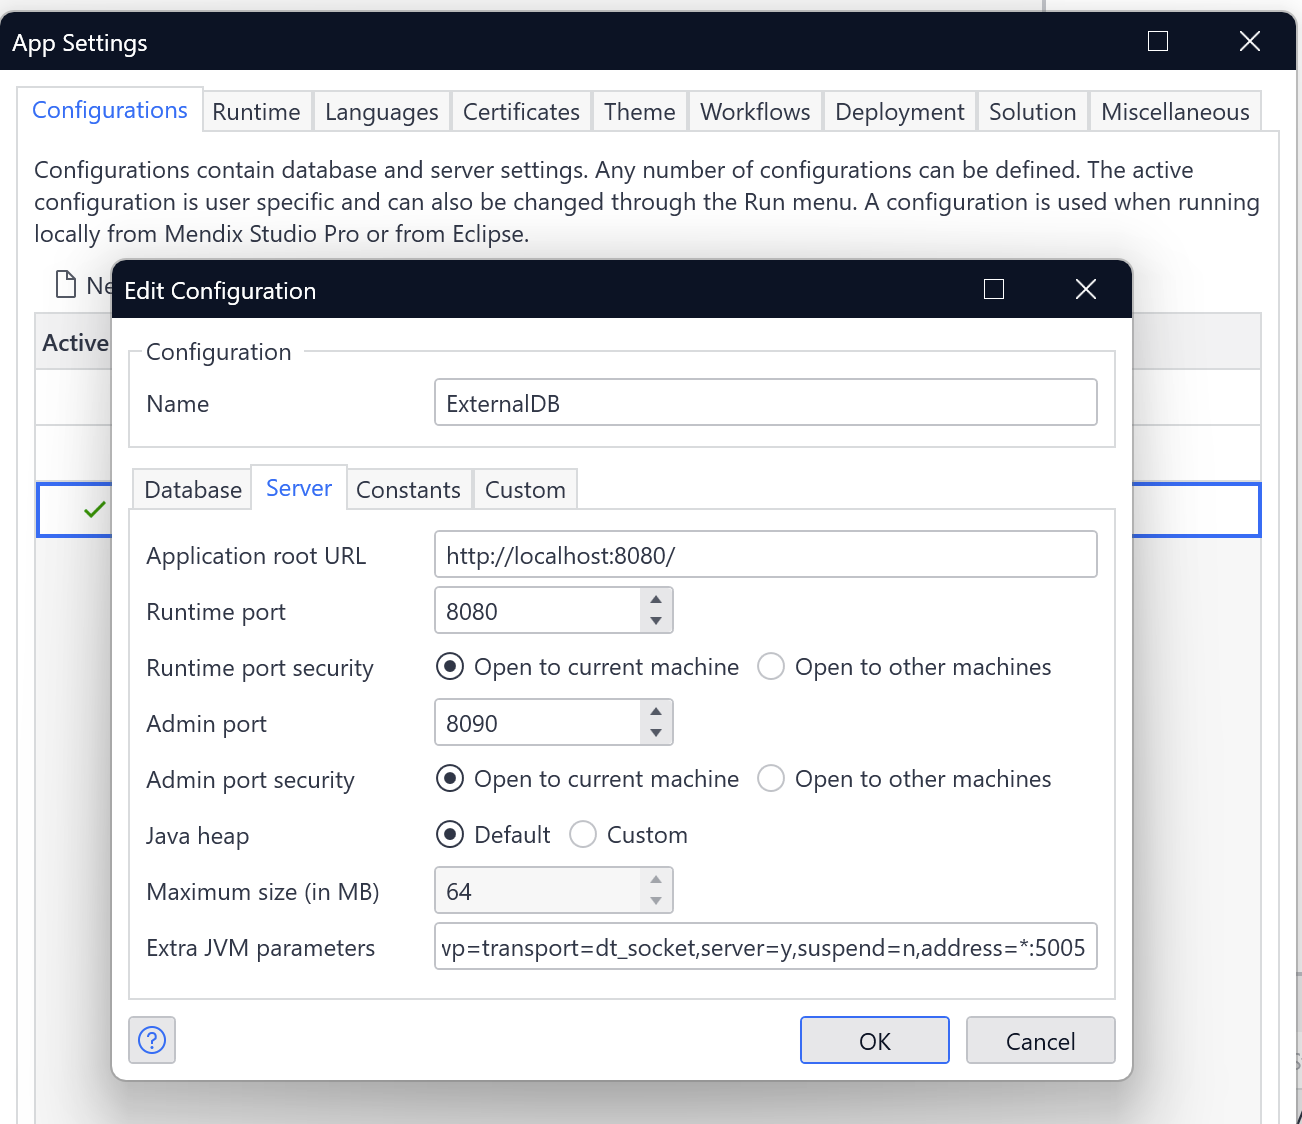 4. Open the Mendix Project in IntelliJ 5. Open the debug configuration, click the `+` icon to add a new configuration, select `Remote JVM Debug` in the popup window. 6. Make sure the parameters in `host` and `port` are the same as the `address` in the Mendix project settings. and also `Command line arguments for remote JVM` should be same as the `Extra JVM parameters` in the Mendix project settings. 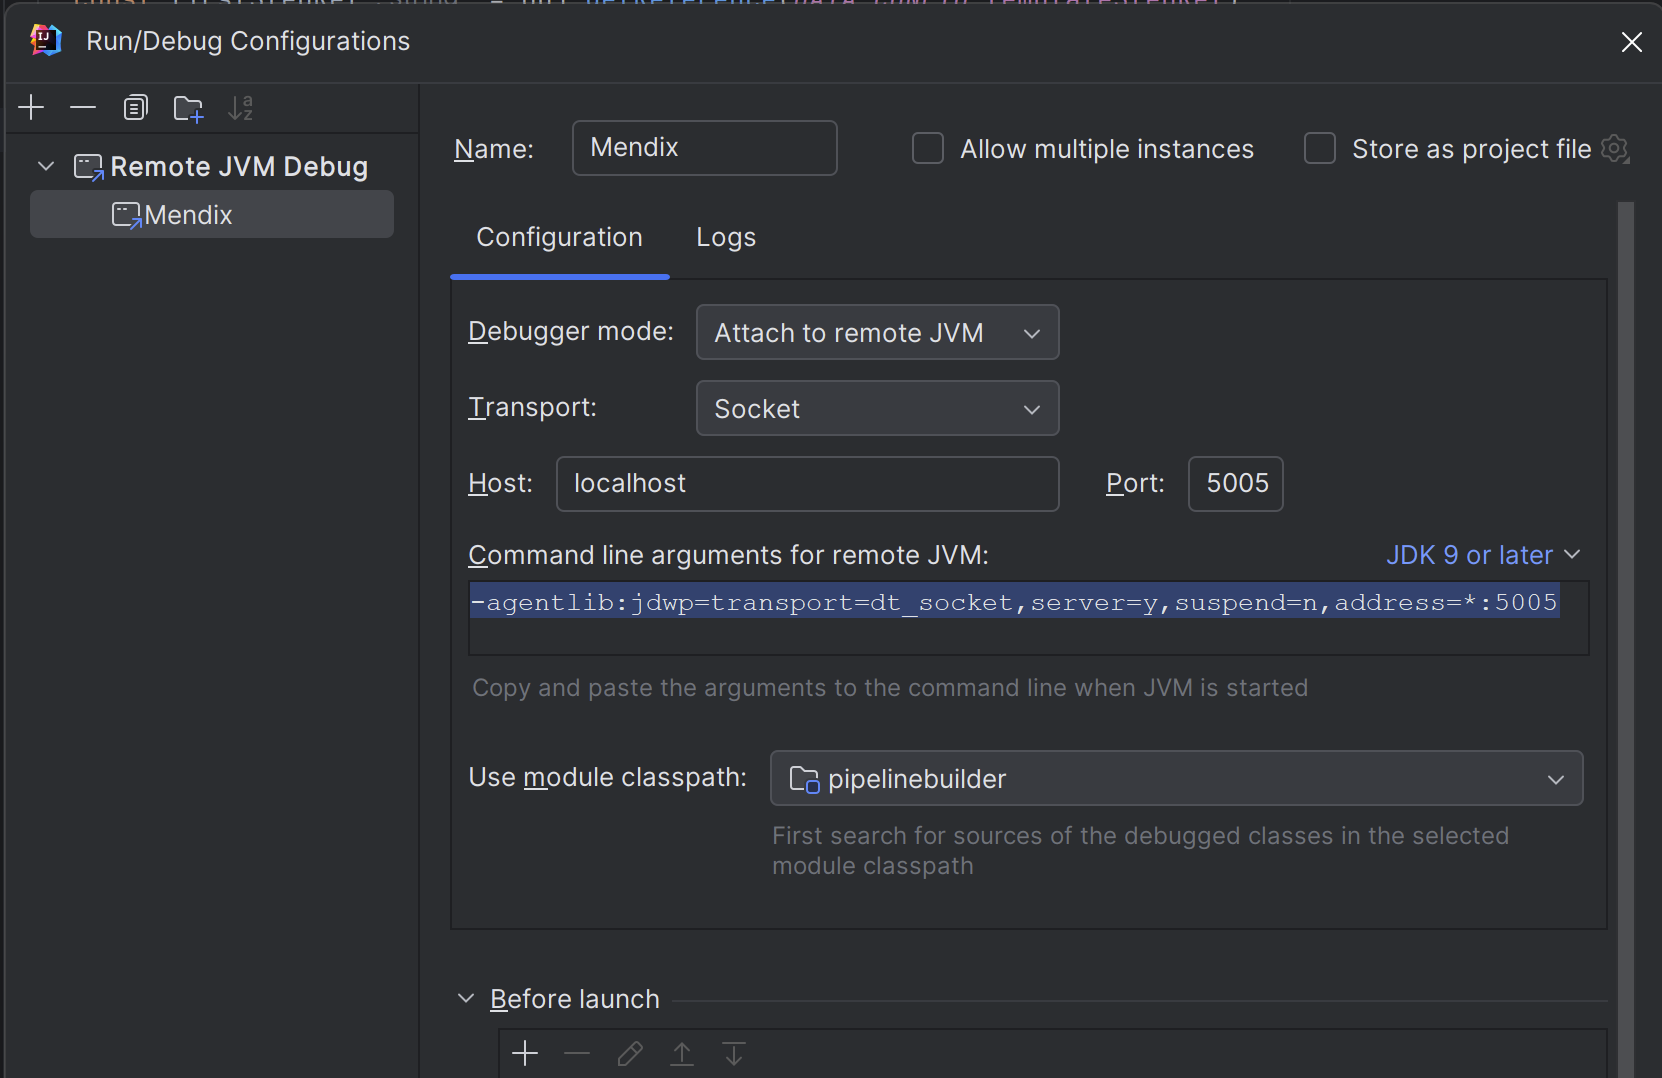 7. Click `Apply` and `OK` to save the configuration. 8. In the Mendix Studio Pro, click the `Run` button to start the project. 9. Now you can set breakpoints in the Java action code, and click the debug button to start the debug session.## Debug Java action with VS Code 1. Keep the Mendix project settings as the same as the IntelliJ settings. 2. Open the Mendix project in VS Code 3. Install the `Java Extension Pack` in the VS Code 4. Open the debug panel in VS Code, click the `Add Configuration` button, select `Java: Attach to Remote Program` in the popup window. 5. Make sure the `host` and `port` are the same as the `address` in the Mendix project settings. and also `Command line arguments for remote JVM` should be same as the `Extra JVM parameters` in the Mendix project settings. ```json { "type": "java", "name": "Mendix Remote Debug", "request": "attach", "hostName": "localhost", "port": 5005 } ``` 6. Click `Apply` and `OK` to save the configuration. 7. In the Mendix Studio Pro, click the `Run` button to start the project. 8. Now you can set breakpoints in the Java action code, and click the debug button to start the debug session.
Read MoreMendix: How to connect to built in hsql database from dbeaver
- Hank
- 29 Aug, 2023
By default, Mendix project is using HSQL as the database.If you want to check the db tables and data, you can simply do this:- start the project from Mendixo Studio Pro - in the console tab, you will find a sub tab `Advanced` - click it will open a menu, there is a item `start built-in database viewer`A database viewer will open, it has simple and basic UI, which you can check all the tables or you project. and do query, delete actions easily.And you can also run SQL in it.Well, this is nice. but it's a bit too simple.Sometimes, especially for those who has more development experience and has own favorite data viewer like MySql workbench, or DBeaver, how to use them to view the Mendix project's database.It's also simple.Let's take DBeaver as example.- open the built-in db viewer in Mendix Studio Pro.- Click `File` - `Connect`, this will open a small window.- In this window, it shows the connect info of current project's dababase, let's call this window `SP Window` for referrence. - Now open DBeaver- Click the new connection icon, in the popup window, type `HSQL` to search, and pick `HSQL Server`- Click `next`. in next window, select `URL`, copy the `jdbc...` value in the SP Window as the `JDBC URL` in DBeaver- For the `Username` and `Password` just use the same one in the SP Window- Click `Finish`You are done, now you can play with the Mendix project database with DBeaver---EOF---
Read MoreFixing the Close Action for a Modal popup in Mendix
- Hank
- 01 Aug, 2023
Our tester engineer recently reported an issue where in a Mendix app, it takes more than 3 seconds to close a popup after clicking the close button.We looked closely at the log and found that it always does some rollback and fetching before actually closing the modal.We found that the default Close action for the modal is Cancel, which means cancel changes that are not committed in Mendix. This explains why it triggers rollback and retrieve before closing, even though no changes have been made.To fix this, you can change the Close action to _Close Page_.However, there is no Close page in the list. There are some options that are bound to other buttons in the modal.So you have to add a button in the modal, bind close page action to the button, and change the Close action of the model to the button.Sometimes you don’t need this extra button shown in the modal; you can just give it a hidden style, like adding `display:none` style in its appearance tab.---EOF---
Read MoreMendix: How to call Microflow in Java Action and use its return value
- Hank
- 28 Oct, 2022
After you dive into Mendix for a longer time, you would find yourself writing java code now and then. Don't worry, good news is that you don't need to write a lot of java code, Mendix is Low Code anyway.In Mendix, java code is been called Java Action.And you will also find you have to call Microflow in your java code. And in the latest version, approx Mendix 8.1, calling a Microflow can be in this way:```java com.mendix.core.Core.microflowCall("YourModule.SUB_ShowMessage") .inTransaction(true) .withParam("Name", "Hank") .withParam("Message", "Just another developer") .execute(this.getContext()); ```This will call your Microflow `SUB_ShowMessage` in your `YourModule` module, passing **Name** and **Message** to it.Sometimes if your Microflow has too many parameters, clearly chaining too many **withParam** is not a proper way. You can use **HashMap**```java java.util.Map params = new java.util.HashMap<>(); params.put("Name", "Hank"); params.put("Message", "Just another developer"); params.put("note", "This seems also a lot of code") com.mendix.core.Core.microflowCall("YourModule.SUB_ShowMessage") .inTransaction(true) .withParams(params) .execute(this.getContext()); ```You can see there is no return value in the Microflow or you don't want/need to use the return value of it.But what about you want to use it?If your Microflow returns a simple value, like _String_, _Long/Integer_, _Boolean_, then it's easy, just assign it to your Java variable:```java Boolean mfValue = com.mendix.core.Core.microflowCall("YourModule.SUB_ShowMessageWithReturnValue") .inTransaction(true) .withParam("Name", "Hank") .withParam("Message", "Just another developer") .execute(this.getContext());// then you can use the mfValue ```Well, this seems easy, what if the Microflow returns an object?When a Microflow returns an Object, it will lose its Entity definition and returns an interface **IMendixObject\*. You can not use it without init it with the corresponding Entity. Let's say, it returns a **System.User\* entity, then you will do this to use it:```java // returns IMendixObject IMendixObject mendixObj = com.mendix.core.Core.microflowCall("YourModule.SUB_ShowMessageWithReturnValue") .inTransaction(true) .withParam("Name", "Hank") .withParam("Message", "Just another developer") .execute(this.getContext());// init with Entity's init function final User user = User.initialize(this.getContext(), mendixObj); ```---EOF---
Read More